


 https://youtu.be/Q_YP6IPcEXs?si=mS9oYuoqNj0IrXRQ
Nicla Sense ME
Bring smart sensing solutions to the edge, with the high-performance, low-power board that packs state-of-the-art Bosch Sensortec technology into our smallest form factor yet.
Nicla Sense ME
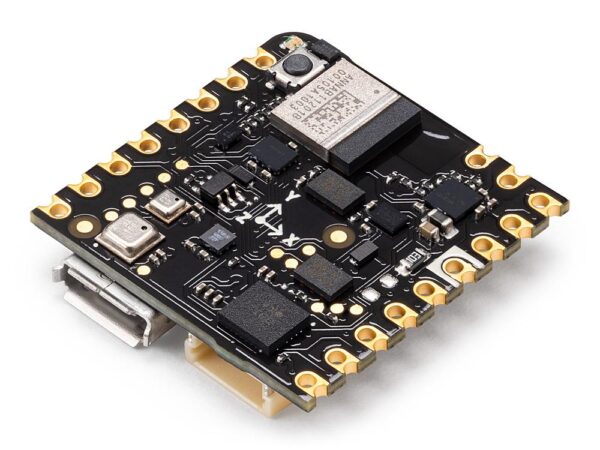
The Nicla Sense ME houses 4 low power sensors in a small footprint enabling powerful data fusion capabilities on the edge. Analyse ‘Motion’ and ‘Environment’ with industrial grade Bosch sensors that can accurately measure rotation, acceleration, pressure, humidity, temperature, air quality and CO2 levels.
The Arduino® Nicla Sense ME is our smallest form factor yet, with a range of industrial grade sensors packed into a tiny footprint. Measure process parameters such as temperature, humidity and movement. Featuring a 9-axis inertial measurement unit and the possibility for Bluetooth® Low Energy connectivity, it can help you to create your next Bluetooth® Low Energy enabled project. Make your own industrial grade wireless sensing network with the onboard BHI260AP, BMP390, BMM150 and BME688 Bosch sensors.
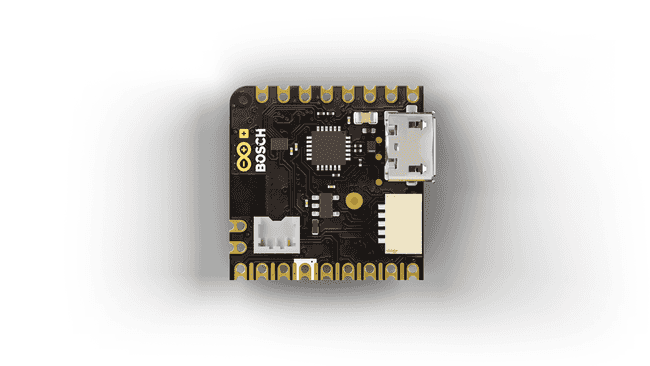
Arduino Nicla Sense ME Cheat Sheet
Learn how to set up the Arduino Nicla Sense ME and get a quick overview of the components. Obtain information regarding pins and how to use the different sensors.
The Arduino® Nicla Sense ME is our smallest form factor yet, with a range of industrial grade sensors packed into a tiny footprint. It features 4 industrial grade Bosch sensors that can accurately measure rotation, acceleration, pressure, humidity, temperature, air quality and CO2 levels.
Goals
This article is a collection of guides, API calls, libraries and tutorials that can help you get started with the Nicla Sense ME board. You can also visit the documentation product page for the Nicla Sense ME.
Core
The Nicla Sense ME uses the Arduino Mbed OS Nicla Boards core.
Installation
Arduino IDE 1.8.X
The Nicla Sense ME can be programmed through the Classic Arduino IDE 1.8.X. To install your board, you can check out the guide below:
Arduino IDE 2
The Nicla Sense ME can be programmed through the Arduino IDE 2. To install your board, you can check out the guide below:
Cloud Editor
The Nicla Sense ME can be programmed through the Cloud Editor. To get started with your board, you will only need to install a plugin, which is explained in the guide below:
Board Not Detected
Sometimes the board is not detected even when the board is connected to your computer. This can be solved through the following steps:
1. Disconnect the board from your computer by removing the USB cable.
2. Reconnect the board to your computer.
3. If it still doesn’t show up, double-tap the reset button, to activate the bootloader mode.
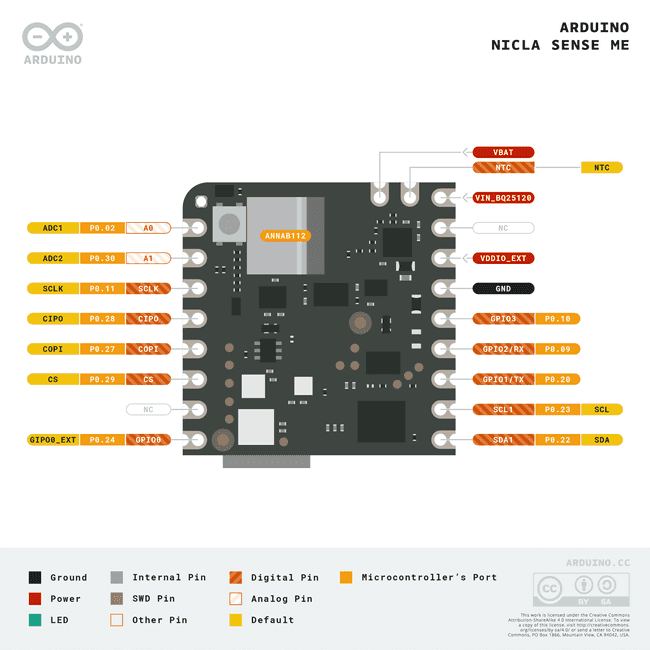
Pins
RGB LED
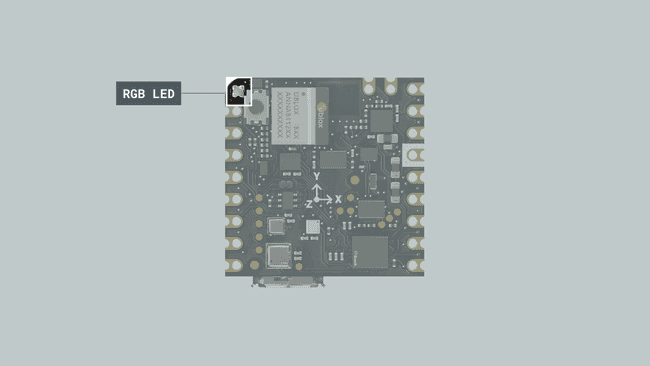
The Nicla Sense ME features a built-in RGB that can be utilized as a feedback component for applications. The LED is connected through I2C, therefore specific functions need to be used to operate the LED colors.
The Nicla System header is required to use the RGB LED.
Sensors
There are three ways to read from the on-board sensors:
- Read the sensors directly from Nicla Sense ME in standalone mode.
- Read sensor values through Bluetooth® Low Energy
- Read sensor values through I2C by connecting an ESLOV cable
To read from the sensors in any of these mode, you need to install the Arduino_BHY2 and Arduino_BHY2Host libraries. These can be found in the library manager using the Arduino IDE. To do so in the IDE, select Tools->Manage Libraries…, now search for Arduino_BHY2 and Arduino_BHY2Host in the new window that opened and click on the install button.
To use the sensors in your sketches, you need to know the sensors ID. You can find them in the section “Sensor IDs” of this article. They can also be found in the header file here. Additionally, there is an example sketch in the library that will print all available sensors in the Serial Monitor of the Arduino IDE. This example sketch can be found in File > Examples > Arduino_BHY2 > ShowSensorList in the Arduino IDE.
In the following section, you can see how these ID’s are used in an Arduino sketch.
Sensor Classes
- Sensor: This class handles all the other sensors which have a single value to be read, like temperature, gas, pressure, etc. And also the event sensors, like the step detector. This generic sensor class provides the sensor data through the
- to get a human readable version of the activity e.g. “Walking activity started”.
- SensorBSEC: BSEC stands for Bosch Sensortec Environmental Cluster, basically you can access the air quality (IAQ) level and it contains the following data:
Function Description Data type iaq()IAQ value for regular use case unsigned 16bit iaq_s()IAQ value for stationary use cases unsigned 16bit b_voc_eq()breath VOC equivalent (ppm) float co2_eq()CO2 equivalent (ppm) [400,] unsigned 32bit comp_t()compensated temperature (Celsius) float comp_h()compensated humidity float comp_g()compensated gas resistance (Ohms) unsigned 32bit accuracy()accuracy level: [0-3] unsigned 8bit
Further down you can see how these objects are used in an Arduino sketch to get readings from the sensors.
Sensor IDs
The IDs to address the sensors both through ESLOV and WebBLE are as follows:
| ID | Description | SENSOR_ID MACRO | Class |
|---|---|---|---|
| 1 | Accelerometer passthrough | SENSOR_ID_ACC_PASS | SensorXYZ |
| 3 | Accelerometer uncalibrated | SENSOR_ID_ACC_RAW | SensorXYZ |
| 4 | Accelerometer corrected | SENSOR_ID_ACC | SensorXYZ |
| 5 | Accelerometer offset | SENSOR_ID_ACC_BIAS | SensorXYZ |
| 6 | Accelerometer corrected wake up | SENSOR_ID_ACC_WU | SensorXYZ |
| 7 | Accelerometer uncalibrated wake up | SENSOR_ID_ACC_RAW_WU | SensorXYZ |
| 10 | Gyroscope passthrough | SENSOR_ID_GYRO_PASS | SensorXYZ |
| 12 | Gyroscope uncalibrated | SENSOR_ID_GYRO_RAW | SensorXYZ |
| 13 | Gyroscope corrected | SENSOR_ID_GYRO | SensorXYZ |
| 14 | Gyroscope offset | SENSOR_ID_GYRO_BIAS | SensorXYZ |
| 15 | Gyroscope wake up | SENSOR_ID_GYRO_WU | SensorXYZ |
| 16 | Gyroscope uncalibrated wake up | SENSOR_ID_GYRO_RAW_WU | SensorXYZ |
| 19 | Magnetometer passthrough | SENSOR_ID_MAG_PASS | SensorXYZ |
| 21 | Magnetometer uncalibrated | SENSOR_ID_MAG_RAW | SensorXYZ |
| 22 | Magnetometer corrected | SENSOR_ID_MAG | SensorXYZ |
| 23 | Magnetometer offset | SENSOR_ID_MAG_BIAS | SensorXYZ |
| 24 | Magnetometer wake up | SENSOR_ID_MAG_WU | SensorXYZ |
| 25 | Magnetometer uncalibrated wake up | SENSOR_ID_MAG_RAW_WU | SensorXYZ |
| 28 | Gravity vector | SENSOR_ID_GRA | SensorXYZ |
| 29 | Gravity vector wake up | SENSOR_ID_GRA_WU | SensorXYZ |
| 31 | Linear acceleration | SENSOR_ID_LACC | SensorXYZ |
| 32 | Linear acceleration wake up | SENSOR_ID_LACC_WU | SensorXYZ |
| 34 | Rotation vector | SENSOR_ID_RV | SensorQuaternion |
| 35 | Rotation vector wake up | SENSOR_ID_RV_WU | SensorQuaternion |
| 37 | Game rotation vector | SENSOR_ID_GAMERV | SensorQuaternion |
| 38 | Game rotation vector wake up | SENSOR_ID_GAMERV_WU | SensorQuaternion |
| 40 | Geomagnetic rotation vector | SENSOR_ID_GEORV | SensorQuaternion |
| 41 | Geomagnetic rotation vector wake up | SENSOR_ID_GEORV_WU | SensorQuaternion |
| 43 | Orientation | SENSOR_ID_ORI | SensorOrientation |
| 44 | Orientation wake up | SENSOR_ID_ORI_WU | SensorOrientation |
| 48 | Tilt detector | SENSOR_ID_TILT_DETECTOR | Sensor |
| 50 | Step detector | SENSOR_ID_STD | Sensor |
| 52 | Step counter | SENSOR_ID_STC | Sensor |
| 53 | Step counter wake up | SENSOR_ID_STC_WU | Sensor |
| 55 | Significant motion | SENSOR_ID_SIG | Sensor |
| 57 | Wake gesture | SENSOR_ID_WAKE_GESTURE | Sensor |
| 59 | Glance gesture | SENSOR_ID_GLANCE_GESTURE | Sensor |
| 61 | Pickup gesture | SENSOR_ID_PICKUP_GESTURE | Sensor |
| 63 | Activity recognition | SENSOR_ID_AR | SensorActivity |
| 67 | Wrist tilt gesture | SENSOR_ID_WRIST_TILT_GESTURE | Sensor |
| 69 | Device orientation | SENSOR_ID_DEVICE_ORI | SensorOrientation |
| 70 | Device orientation wake up | SENSOR_ID_DEVICE_ORI_WU | Sensor |
| 75 | Stationary detect | SENSOR_ID_STATIONARY_DET | Sensor |
| 77 | Motion detect | SENSOR_ID_MOTION_DET | Sensor |
| 91 | Accelerometer offset wake up | SENSOR_ID_ACC_BIAS_WU | SensorXYZ |
| 92 | Gyroscope offset wake up | SENSOR_ID_GYRO_BIAS_WU | SensorXYZ |
| 93 | Magnetometer offset wake up | SENSOR_ID_MAG_BIAS_WU | SensorXYZ |
| 94 | Step detector wake up | SENSOR_ID_STD_WU | Sensor |
| 115 | BSEC data | SENSOR_ID_BSEC | SensorBSEC |
| 128 | Temperature | SENSOR_ID_TEMP | Sensor |
| 129 | Barometer | SENSOR_ID_BARO | Sensor |
| 130 | Humidity | SENSOR_ID_HUM | Sensor |
| 131 | Gas | SENSOR_ID_GAS | Sensor |
| 132 | Temperature wake up | SENSOR_ID_TEMP_WU | Sensor |
| 133 | Barometer wake up | SENSOR_ID_BARO_WU | Sensor |
| 134 | Humidity wake up | SENSOR_ID_HUM_WU | Sensor |
| 135 | Gas wake up | SENSOR_ID_GAS_WU | Sensor |
| 136 | Hardware Step counter | SENSOR_ID_STC_HW | Sensor |
| 137 | Hardware Step detector | SENSOR_ID_STD_HW | Sensor |
| 138 | Hardware Significant motion | SENSOR_ID_SIG_HW | Sensor |
| 139 | Hardware Step counter wake up | SENSOR_ID_STC_HW_WU | Sensor |
| 140 | Hardware Step detector wake up | SENSOR_ID_STD_HW_WU | Sensor |
| 141 | Hardware Significant motion wake up | SENSOR_ID_SIG_HW_WU | Sensor |
| 142 | Any motion | SENSOR_ID_ANY_MOTION | Sensor |
| 143 | Any motion wake up | SENSOR_ID_ANY_MOTION_WU | Sensor |
The syntax to instantiate a sensor object is
Standalone Mode
In standalone mode, the sensors can be accessed through sensor objects. The sensor data is then read by Nicla Sense ME’s on-board microcontroller.
IMU
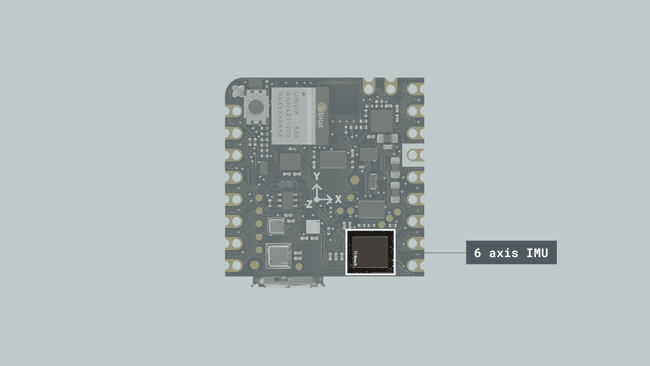
The IMU sensor
Sensor Data Over ESLOV
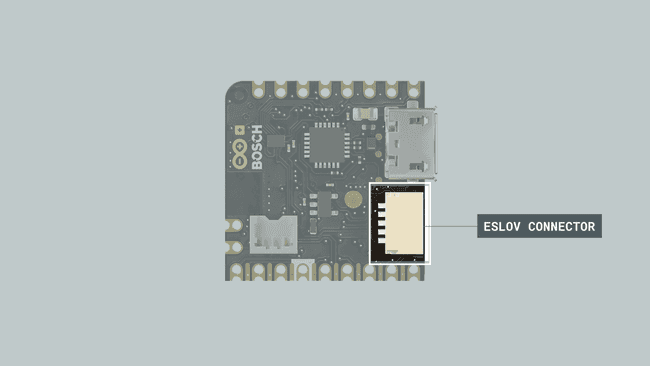
In order to transmit data over ESLOV to another Arduino board you need to connect the boards with an ESLOV cable. The Nicla Sense ME could for example be connected to an Arduino Portenta H7.

- To have the Nicla Sense ME pass the sensor data through ESLOV, you need to upload the App sketch. You can find it in the Examples menu in the IDE under Arduino_BH2 > App. After you upload the sketch, you can disconnect the Nicla Sense ME from the USB cable. It can be powered through the ESLOV connection.
- For the receiving device you need to upload the passthrough sketch. You can find it in the Examples menu in the IDE under Arduino_BHY2Host > Passthrough. After you upload the sketch, a separate serial port will be exposed. One port is used for debugging and the other one is used for passing through the sensor data. The latter one is the one you will use to configure the sensors and read from them.
- When you’re done uploading the sketches, you can use the bhy script to interact with the sensors. In the downloaded package (see here), navigate into the tools folder. There you will find binaries of the bhy tool for Linux and Windows. If you like, you can build the tool yourself (e.g. if you are on macOS). For that, if you haven’t installed Go yet, please do so by following there instructions. From the terminal execute this command to start the build:
Sensor Data Over WebBLE
Sensor data from the Nicla Sense ME can also be retrieved through Bluetooth® Low Energy in the web browser. For that you can use the bhy tool. Please follow steps 1 – 3 from the “Sensor Data Over ESLOV” section. Then execute the following command to start the webserver:
./bhy webserver. When the server has started, you can open the landing page in your browser: http://localhost:8000/. Click on “Open sensor page”.
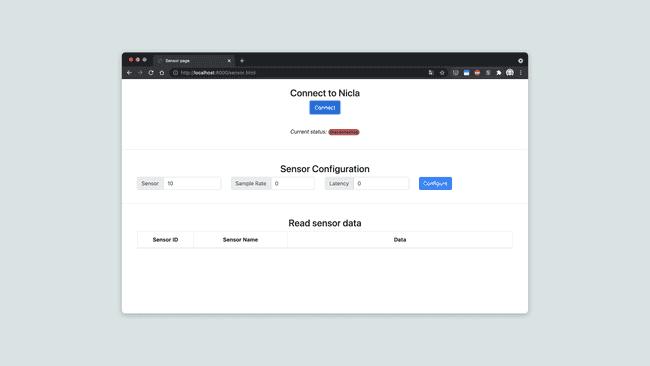
Sensor page in the browser
Then click the “Connect” button and pair your computer with the Nicla Sense ME board.
For this feature to work, make sure that Web Bluetooth® Low Energy is both supported and enabled! In Google Chrome go to chrome://flags and enable “Experimental Web Platform features”.
You can check the browser compatibility with WebBLE here.
Use the sensor IDs from the section “Sensor IDs” to enable and configure the desired sensors. A sample rate > 0 will enable the sensor.
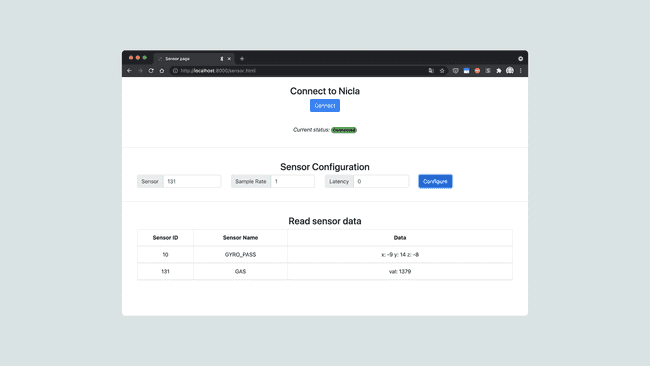
Configured sensors
BSX Sensor Fusion Software
The BHI260AP sensor runs a customizable firmware based on the BSX Sensor Fusion library. It provides a complete 9-axis fusion solution, which combines the measurements from 3-axis gyroscope, 3-axis geomagnetic sensor and a 3-axis accelerometer, to provide a robust absolute orientation vector. The algorithm fuses the sensor raw data from the accelerometer, geomagnetic sensor and gyroscope in an intelligent way to improve each sensor’s output.
Go to this site or take a look at the BHI260AP’s datasheet for more information.
Communication
Like other Arduino® products, the Nicla Sense ME features dedicated pins for different protocols.
Bluetooth® Low Energy
Using the BHY2Host Library with Bluetooth® Low Energy
The BHY2 library for the Nicla Sense ME can automatically send sensor values over a Bluetooth® Low Energy connection to a host board that uses the Arduino_BHY2Host library.
Include the BHY2Host library at the top of the sketch of the Host board.
Configure the sensors the same way as you do with the BHY2 library except of the
beginfunction that takes a
NICLA_VIA_BLEparameter.
The parameters of
BHY2Host::beginare: data pass through and communication configuration. The first parameter defines if the data should be passed through the Serial connection. This allows to control the Nicla Sense ME from a PC when connected through a host board. You can use the arduino-bhy tool to control the Nicla Sense ME from either the PC command line or from a web page. The second parameter can take one of the following values: NICLA_VIA_BLE, NICLA_AS_SHIELD, NICLA_VIA_ESLOV (default).
Using the Bluetooth® Low Energy Library
To enable Bluetooth® Low Energy on the Nicla Sense ME, you can use the ArduinoBLE library. The example sketches included in the library work also with Nicla Sense ME with some minor modifications:
Conclusion
This cheat sheet is written as a quick reference mainly to look up the features of this product. For a more in-depth walk though experience, please have a look at the other tutorials.


Reviews
There are no reviews yet.